QualityOne Vaults provide suppliers with an Admin-configurable interface to collaborate with buyers when participating in the QMS process. Suppliers can review and update nonconformance details and create related items. Access to Supplier Portal is through Vault, using the credentials provided to users. Users must have the appropriate permissions to view the records they need to interact with.
You can configure Supplier Portal to provide suppliers with a read-only view of nonconformance records, and configure the portal to allow suppliers to create the appropriate related records in different sections. You can provide instructions to users to guide them through the process in each section.
Note: This feature is not available unless it was enabled in your Vault prior to 25R2. The External Collaboration Management feature provides similar functionality by enabling the assignment of an external collaborator to respond to requests on supported object records.
Configuring Supplier Portal
Currently, you can configure QualityOne supplier portal for the NCR (ncr__v) object only. Configuring supplier portal involves standard object layout configuration; however, supplier portal includes the unique functionality of the Detail Form with Carousel and Related Object List View sections.
Configuring Supplier Portal involves the following general steps:
- Creating an NCR object, including selecting the NCR type.
- Configuring the object layout, including the supplier portal-specific sections.
- Assigning the NCR to a supplier.
Note: Depending on your Vault’s creation date and which features are currently enabled and configured, some of the steps described in this article may be unavailable or already complete in your Vault.
Configuring Detail Form with Carousel
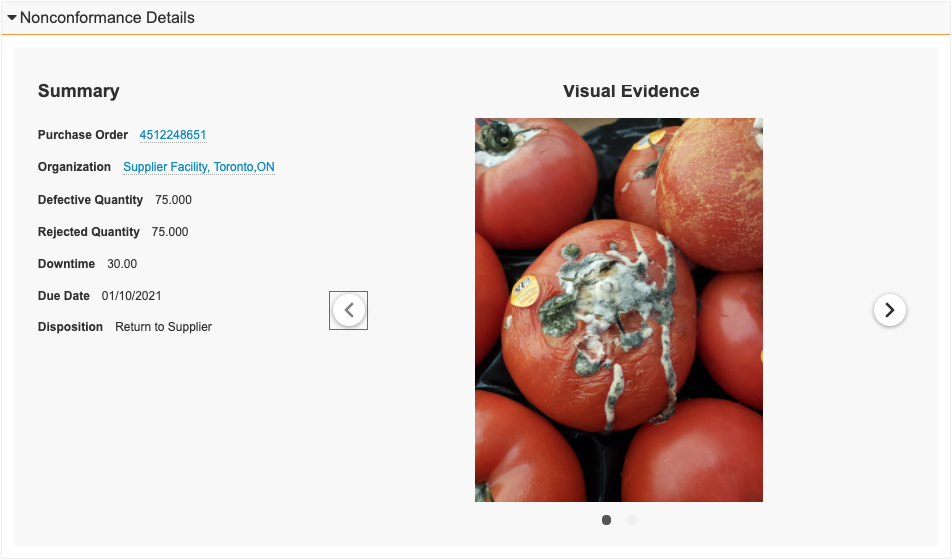
The Detail Form with Carousel section is a read-only object layout section that allows suppliers to review nonconformance details and related objective evidence so they can take appropriate actions as needed.
You can configure the Detail Form with Carousel section to display details about the NCR. You can optionally display details in one (1) or two (2) groups with a label for each group, and specify which fields to include in each group. You can include an image carousel which allows users to click image attachments.
How to Insert Detail Form with Carousel Sections
To insert a Detail Form with Carousel section:
- In the NCR object layout editor, click Insert Section.
- Select Detail Form with Carousel.
- Enter a Section Label and Section Name. Only the label will appear for users.
- Optional: In the Show the section only in these lifecycle states field, select one (1) or more lifecycle states. This option only appears for objects that use lifecycles.
- Optional: Enter the Group 1 Label. Group 1 displays at the top of the left side of the section.
- Optional: Enter the Fields in Group 1. Use the Name of any NCR object fields except for fields of type Formula. Fields display in the order listed. If you do not enter the Group 1 Label, fields display without a group header.
- Optional: Enter the Group 2 Label. Group 2 displays below Group 1 on the left side of the section if you have specified values for Group 1. If you specify values only for Group 2, Group 2 appears at the top of the section. Use Group 2 only if you want to display two (2) groupings of fields.
- Optional: Enter the Fields in Group 2. Use the Name of any NCR object fields except for fields of type Formula. If you do not enter the Group 2 Label, fields display without a group header. Fields display in the order listed.
- Optional: Select the size of the Image Carousel to include in the section or select None to exclude the image carousel.
- Optional: Enter the Title for the image carousel.
- Click Done.
Note: Do not include any fields of type Object Reference which reference the User object in Fields in Group 1 or Fields in Group 2.
Configuring Related Object List View
The Related Object List View section is an object layout section that allows suppliers to take appropriate action within the context of the page after reviewing nonconformance details.
You can configure the actions that suppliers can take against related object records as well as the fields for which suppliers provide values.
In order for users to be able to include attachments, ensure you have Allow Attachments enabled on any related objects for which you insert sections.
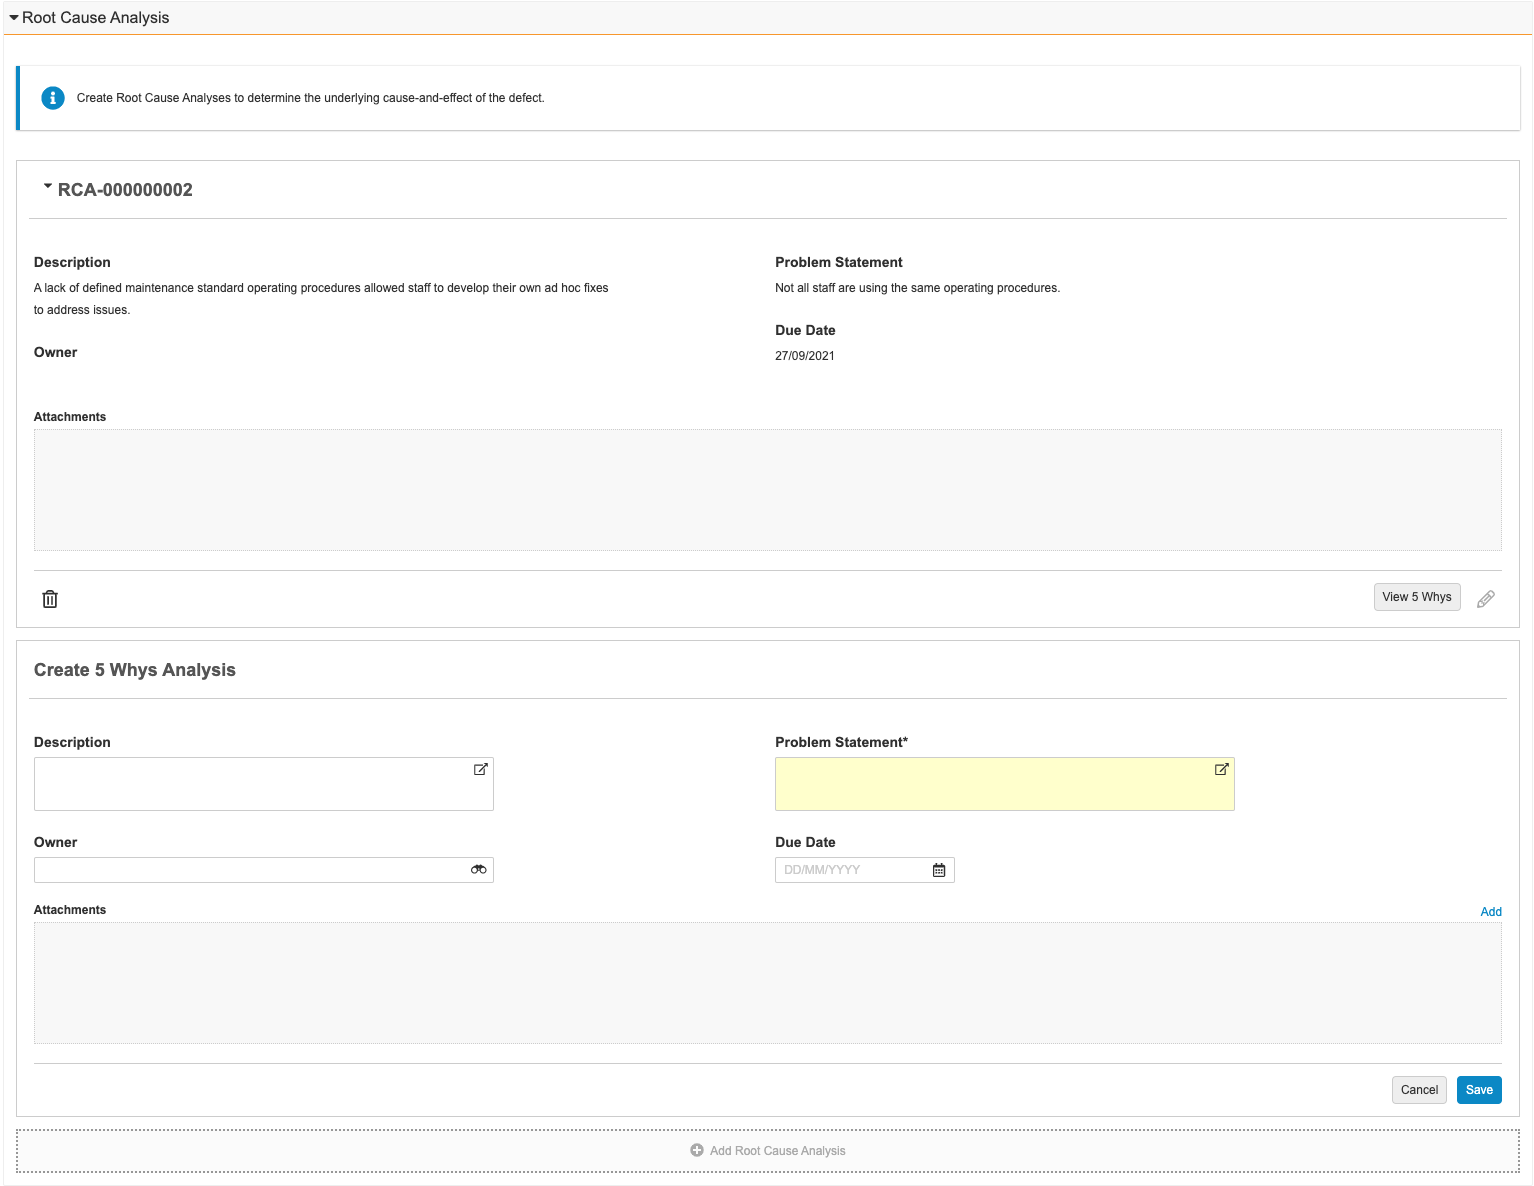
If you want to provide suppliers with the option to view a 5 Whys diagram from a record within a section, select Root Cause Analysis (rca__v) as the related object. Using Root Cause Analysis (rca__v) as the related object for a section includes a button called View 5 Whys which suppliers can click to open and view the related 5 Whys diagram, if the record has one (1).
Note: You must ensure suppliers are granted the appropriate view, create, edit, and delete permissions on the objects you include in Related Object List View sections so they can interact with objects.
How to Insert Related Object List View Sections
To insert a section showing related object records in list view:
- In the NCR object layout editor, click Insert Section.
- Select Related Object List View.
- Enter a Section Label and Section Name. Only the label will appear for users.
- Optional: In the Show the section only in these lifecycle states field, select one (1) or more lifecycle states.
- Optional: Enter the Instruction Text to provide the user with guidance of what to do in this section.
- Optional: Enter the text to use for the Instruction Link Text which users can click to open a document in a new tab containing further instructions or extra information.
- Optional: Enter the Link Document ID of the document to link to. Ensure users have the appropriate permissions to access the document and that the document is in Steady State.
- Enter the Name (not the Label) of a Related Object.
- Optional: Enter the Name (not the Label) for the Object Type of the Related Object. If you do not enter an object type, Vault uses the default object type
- Enter the Object Reference Field on Related Object to provide the field on the related object that refers back to the NCR object.
- Choose a Section Layout: One Column or Two Columns.
- Enter the Name of the Fields on the related object to display in the section.
- Optional: Select Is Expanded to have the section expanded by default when the page loads.
- Specify the label for the Add Button which users click to add new records.
- Enter the Name of a related object field to use to display as the List View Header Field.
- Optional: Enter the Name of a related object field to use as the List View Subtext Field.
- Optional: Enter the First Attachment Section Label. The first attachment section displays on the left side at the bottom of the section.
- Optional: Enter the text to use as the First Attachment File Prefix. This text is added to the beginning of the filenames, followed by an underscore, for files attached in this section. For example, if you entered the text Before, a file called example.png would appear as Before_example.png.
- Optional: Enter the Second Attachment Section Label. The second attachment section displays on the right side at the bottom of the section. If you specify values only for the second attachment section, the second attachment section appears on the left side of the section. Use the second attachment section only if you want to display two (2) groupings of attachments.
- Optional: Enter the text to use as the Second Attachment File Prefix. This text is added to the beginning of the filenames, followed by an underscore, for files attached in this section.
- Click Done.
NCR Lifecycle
NCR object records use the NCR object lifecycle. Your organization may add custom lifecycle states to suit your specific needs.
Configuring User Permissions
You must ensure users have the appropriate read and create permissions to access the appropriate objects and object fields in addition to the permissions outlined below:
- For the NCR object: Read permission.
- For suppliers to interact with Related Object List View sections, ensure the related object has the Read, Create, Edit, and Delete permissions.
Related Permissions
You can complete all the steps in this article with the standard System Administrator or Vault Owner security profile. If your Vault uses custom security profiles, your profile must grant the following permissions:
| Type | Permission | Controls |
|---|---|---|
| Security Profile | Admin: Configuration: Object Lifecycles: Create, Edit | Ability to create and modify lifecycles. |
| Security Profile | Admin: Configuration: Object Workflows: Create, Edit | Ability to create and modify workflows. |
| Security Profile | Admin: Configuration: Objects: Create, Edit | Ability to create and modify Vault objects. |